This is the main part of the whole series: an actual RDD session demo. It involves a subset of account detail - web: validate interceptor set PR as it represents a good example of an RDD session, because:
- it doesn’t involve too much setup and boilerplate: most of it has already been implemented in the previous PR. As RDD is basically a workflow in which the developer builds the application in an interactive relation with the REPL by means of her REPL-friendly IDE (in our case, Emacs), while setup and boilerplate somehow block that flow
- it is not too large but, at the same time, large enough to be meaningful
- in contrast with the previous PR, which involves basically code related with the database and, hence, mainly stateful, this PR involves basically Pedestal interceptors, which are basically pure functions, and thus very easy to be unit tested. So, in this RDD session, we will be able to include implementation and execution of those unit test cases as well
- regarding RDD, subsequent endpoints implementation will be basically the same. So, with exactly the same Emacs shortcuts we are about to expose, it might be an excellent exercise for the interested reader to reproduce in Emacs and REPL the API construction explained in the rest of this post series, along this project’s PR sequence
Emacs Installation and Setup
I use GNU Emacs.
For its installation, I have followed instructions given in main page of their Web site.
Regarding its setup, I share my config here. It’s based on instructions given in this article. Furthermore, this particular elisp file gives a brief summary.
Implementation
Please take into account implementation we will code in this RDD session will be slightly different from the one you’ll find out in the PR it is a subset of: account detail - web: validate interceptor set PR. We will skip some parts in order to keep focus on RDD flow. And we will include some improvements which will be added in subsequent PRs.
First, let’s switch to the branch account-detail-db, the one corresponding to the previos PR and, from it, create a new branch, somehow duplicated with account-detail-web, the one corresponding to next PR. Let’s call it the same way, but with a differentiating suffix: account-detail-web-rdd-demo.
$:(main) git checkout account-detail-db
Switched to branch 'account-detail-db'
Your branch is up to date with 'origin/account-detail-db'.
$:(account-detail-db) git checkout -b account-detail-web-rdd-demo
Switched to a new branch 'account-detail-web-rdd-demo'
$:(account-detail-web-rdd-demo)
First, let’s add Pedestal dependencies into deps.edn:
{:paths ["src"]
 :deps {org.clojure/clojure {:mvn/version "1.10.2"}
        com.datomic/datomic-free {:mvn/version "0.9.5697"}
        mount/mount {:mvn/version "0.1.16"}
        io.pedestal/pedestal.service {:mvn/version "0.5.8"}
        io.pedestal/pedestal.jetty {:mvn/version "0.5.8"}}
...
}
Then, in src/accounts directory, create web/interceptors nested directories, and validate.clj file there by means of “visit new file” Emacs shortcut: C-x C-f, and name the new file as web/interceptors/validate.clj. New buffer for new file gets opened. Then save the file with C-x C-s: as Emacs asks "src/accounts/web does not exist; create? (y or n)", type y and press Enter, and file as well as nested directories are created.
In the new file, press C-c C-r n i to get Clojure namespace added. Then let’s add there a Pedestal interceptor to validate whether account’s id is actually set in the route’s path as path parameter:
(ns accounts.web.interceptors.validate
  (:require [io.pedestal.interceptor.chain :as chain]))

(def account-id-available
  {:name :validate-account-id-available
   :enter
   (fn [context]
     (if-let [id (get-in context [:request :path-params :account-id])]
       context
       (chain/terminate
        (assoc context :response {:status 400
                                  :body "No account id supplied as path param in URL"}))))})
Save it with C-x C-s.
Next, open the REPL by pressing C-c M-j from the just created Clojure file. And from within our new file, type C-c C-k to compile it, and load it into REPL, just to make sure it compiles right.
By the way, with C-x C-b, you get a buffer listing all active buffers, and with C-x b, you can get to one of them by typing (with autocomplete) its name.
Unit Tests
To the great advantages depicted above regarding the combination of a REPL-oriented programming language, such as Lisp dialects, and Clojure in particular, with a REPL-friendly IDE such as Emacs, we have a third one, perhaps the most powerful: the functional programming paradigm.
Clojure embraces this paradigm, which basically proposes working as far as possible just with “pure” functions, that is: functions without any side effect, i.e. state. Logic implemented in a function must have a single input: function parameters. And a single output/effect: function returned result. “Impure” functions, the one which doesn’t fully fulfill this requirement, must be kept in a single module of the application.
This criteria improves greatly application architecture, implementation and maintainability. One of the aspects of application development which gets mostly improved is unit testing. As pure functions doesn’t have any side effect / state, they are very easy not just to get tested, but to keep those tests up to date along application implementation evolution. Basically, they doesn’t need mocks.
So, let’s create the file where we will code the unit test cases for the intereceptor we have just implemented: in test/accounts directory, press C-x C-f and, when promted “Find file”, set web/interceptors/validate_test.clj. Save the new file’s buffer pressing C-x C-s and, when prompted that this new directory “does not exist: create? (y or n)”, confirm it with a y. Set Clojure’s namespace by pressing C-c C-r n i. And then, let’s implement the test case:
(ns accounts.web.interceptors.validate-test
  (:require [clojure.test :refer :all]
            [accounts.web.interceptors.validate :refer :all]))

(deftest can-validate-account-id-available
  (testing "validate account id available"
    (let [context-1 {:request {:path-params {:account-id "account-1"}}}
          context-2 {:request {:path-params {}}}]
      (is (= context-1 ((:enter account-id-available) context-1)))
      (is (= {:status 400 :body "No account id supplied as path param in URL"}
             (:response ((:enter account-id-available) context-2)))))))
The first thing we can do is running both test cases implemented in validate_test.clj. From that file, press C-c M-n n so that in REPL the namespace is set to this file’s. Then press C-c C-k to get test case compiled and loaded into REPL, and C-c C-z to jump into REPL, and run there (run-tests) in order to run all (two) the test cases in this file:
accounts.web.interceptors.validate-test> (run-tests)

Testing accounts.web.interceptors.validate-test

Ran 2 tests containing 4 assertions.
0 failures, 0 errors.
{:test 2, :pass 4, :fail 0, :error 0, :type :summary}
accounts.web.interceptors.validate-test>
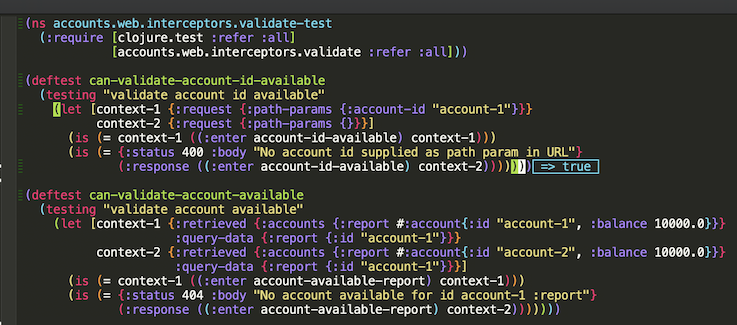
Then, we can run single set of test cases: with the cursor put in let’s enclosing parenthesis, press C-x C-e, as shown below:

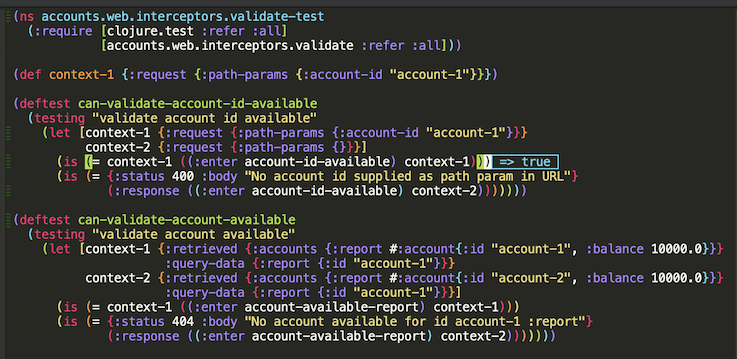
Or a single test case as well. But, in this case, expressions in let cannot been run, so they must be replaced by a def, as shown below:

PR corresponding to this RDD demo is available here.
Next Step
Hence, we are now ready to go on with next endpoint: transaction list.
So, let’s jump to next part !